 |
get handy: build a basic Bookcase| instructions
|
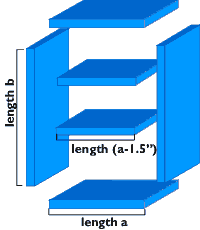
materials | 1"x10" or 1"x12" pine board, planed (i.e., don’t get the unfinished, rough-looking stuff) and as straight and knot-free as possible. You can get your wood at a Home Depot-type place, but lumberyards will have nicer stuff. To calculate how much you’ll need: length=2a+2b+(number of shelves desired)x(a-1.5"), where a= (length of bottom/top piece) and b=(length of side piece). Note: Keep in mind that the longer a piece you buy, the cheaper you’ll be paying by foot, so it’s better to get one 12’ section that two 6’ sections.  8
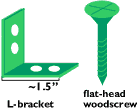
- 1.5" long flathead woodscrews 8
- 1.5" long flathead woodscrews16x(# of shelves desired) ½" long woodscrews 4x(# of shelves desired) L-brackets wood glue
tools |handsaw (or circular saw, if you’ve got one) electric drill screwdriver c-clamps sandpaper ruler approximate cost | For a 9’ tall, 1.5’ wide bookcase with 7 shelves, or 4.5’ tall, 3’ wide bookcase with 3 shelves, the cost for materials would be around $30 or so. Hint: Before you begin, draw out your plans for your bookcase on paper, approximately to scale, so you can figure out how to maximize your wood use. 1. You’ll be cutting your pine board into two pieces of length a, and two of length b, plus however many shelves of (a-1.5") length that you’d like. (Yes, that measurement for the shelves is indeed "-1.5", not 2", due to the fact that the thickness of your 1"x10" or 1"x12" will actually be ¾", not 1". ) Measure carefully before cutting, and mark with a line.2. Use
c-clamps to clamp the board to a pair of sawhorses, or on a sturdy
table/workbench, in such a way that the cut line hangs just off the edge
of whatever you’re using as a support. You’ll want to insert a piece
of wood between the c-clamp and your board, to avoid putting a big dent 3.
Sand the rough cut edges using the sandpaper.
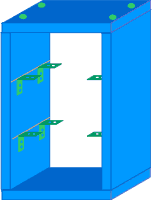
6. Use a drill bit that’s smaller in diameter than your wood screws to first drill holes where the screws will go. This will help to prevent the wood from splitting when it comes time to put in the screws. Once you’ve drilled those holes, the screws are ready to go in. If your drill has an electric screwdriver attachment, by all means use it; otherwise, a good old-fashioned manual screwdriver will do just fine. 7. Determine where you want to place your shelves. Take a look at your book collection and determine whether you’ll need tall shelves, medium shelves, short shelves, or a combination thereof. Bear in mind that it’s a good idea
to put the tall heavy books on the bottom, where there’ll be no danger
of shelf warp-age. Using your ruler, measure along the two sides of the
bookshelf to mark a line in each spot where you’ll want to install a
shelf.
8. Slide in your shelves (painted and stained, if you’d like) so they rest on the L-brackets. Note: If you've made a tall bookcase, you'll want to screw at least one of the middle shelves to the L-brackets to keep the sides from bowing out. Adding a 1"x2" or 1"x3" board that runs down the back of the bookcase will also help. You can screw L-brackets to that back spine, providing better support for the shelves. If you've made a very wide shelf, and it seems a bit wobbly, screw L-brackets into the bottom and top pieces as well; also, consider adding braces (they look like flat L's) to the back joints for increased stability, or alternatively, inserting another vertical divider. 9. Slide in your shelves (painted and stained, if you’d like) so they rest on the L-brackets. 10. Add books and enjoy!
|