 |
|
it's curtain time Print out these instructions.
make a curtain rod
 All of these materials can be found at a Home
Depot-type store. Use
electrical conduit for your rod, rather than the galvanized steel pipes
that you'll find in the plumbing section -- you'll save yourself
quite a few bucks.
All of these materials can be found at a Home
Depot-type store. Use
electrical conduit for your rod, rather than the galvanized steel pipes
that you'll find in the plumbing section -- you'll save yourself
quite a few bucks.
what you’ll need
1.
Decide how high you’ll want to position your rod – just above the
window is certainly a logical choice, but there’s no reason you can’t
go higher if you like. Mark the position for the bottom of the 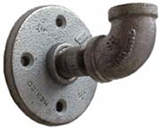 curtain
rod with a pencil.
curtain
rod with a pencil.
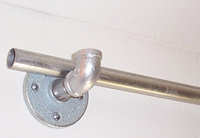
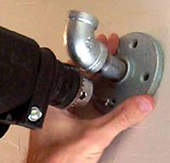
2. Attach an elbow onto one end of each steel pipe nipple; screw each remaining end into the flange (as shown).
3. Determine the positions for the assembled flange pieces along the wall. The top of the steel pipe nipple should coincide with the position that you marked in step 1, and you’ll want the flanges just outside the width of the window. Mark the positions for the four screw-holes in each flange.
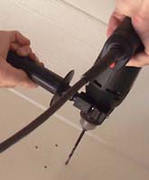
| 4.
Set aside the assembled flange pieces. Drill where you’ve
marked the screw-holes.
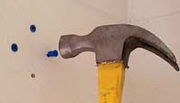
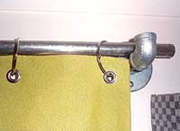
5. Gently hammer in the plastic anchors for each drilled hole. 6. Line up your assembled flange pieces with the holes, and screw them into place. (You may need to unscrew the elbow to get some of your screws in place). 7. Pop up your curtain rod and you’re ready to hang a curtain.
|
   |
make a curtain
 If
you need floor-length curtains, use the ever-useful, supremely versatile
flat sheet. Otherwise, you can check the sale areas of fabric and
upholstery stores for super steals. I managed to pay just $8 for 2 yards
of the heavy fabric used for the curtain for my home office window.
If
you need floor-length curtains, use the ever-useful, supremely versatile
flat sheet. Otherwise, you can check the sale areas of fabric and
upholstery stores for super steals. I managed to pay just $8 for 2 yards
of the heavy fabric used for the curtain for my home office window.
what you’ll need
1. Measure the distance from the bottom of your window to the bottom of your curtain rod to determine the height of your finished curtain panel(s), then add 2" to allow for a top and bottom hem*. Now measure the width of your window. Divide the width by the number of fabric panels you intend to make to cover your window (unless you’re getting funky, that number will probably be one or two)**. Add at least 2" to allow for the side hems. Voila: you have the magic number for the fabric dimensions you’ll require per panel.
*Note: I used a fairly heavy-duty fabric
here for my curtain – the better to block out that brutal Arizona sun.
If you’re making a lighter-weight curtain – a gauzy sheer, for
instance – allow an additional 1" for the height of the curtain.
You'll need the extra reinforcement at the top for the grommets.
** If you want some volume to your treatment, double the width
measurement to allow for some fullness. A fuller curtain will help block
more light, which may or may not be a good thing, depending upon how
much sun your window happens to get, and whether you like bright sunny
spaces, or prefer cave-like dwellings.
2. Hem the sides of each panel: With the fabric face-down on the iron board, fold the fabric ¼" and iron the seam flat. Fold the fabric another ¾" – be careful to keep that first ¼" flap tucked under – and iron again. If you’re having problems keeping the crease for the hem, you might want to pin the hem in place.
3. Use a straight stitch to hem the sides.
4. Repeat steps 2 and 3 with the top and bottom of the curtain panel. Note: If you’re using a delicate fabric, and have paid attention to the suggestion in step 1 for working with lighter materials, fold the top 1½" instead of ¾" to create a wider hem.
5.
Measure and mark the placement for your grommet holes along the length
of the top of the curtain panel. You’ll want holes at either end of
your panel, of course – additional holes should be approximately
6" or so apart. If you’re using a heavy fabric, you can position
the grommets just below the top hem; with lightweight fabrics, you’ll
want additional reinforcement, so it’s a good idea to position the
grommets within the hemmed area.
6. Use the grommet tool to cut out the holes as marked; if your fabric is being stubborn, don’t despair! Grab some scissors and snip a small X at each mark, just wide enough to accommodate the grommets.
 7.
Now you’re ready to start attaching those grommets – just follow the
instructions that accompanied your grommet tool.
7.
Now you’re ready to start attaching those grommets – just follow the
instructions that accompanied your grommet tool.
8. Attach the curtain rings and hang up that curtain!