|
|
|
|
|
 |
|
. |
|
||||||||||||||
copyright ©1999-2004 |
crafty
crafty: Make
a
sweater
pillow by Yee-Fan Sun | 1 2 3 continued from page 1
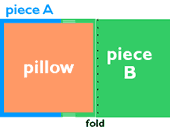
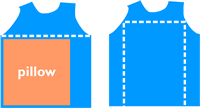
4 At this point, you'll have four more or less rectangular pieces of sweater fabric. Time to decide how you want to lay out the color blocks for your pillow. With your pillow in front of you, start draping pieces of sweater on top of it to get a feel for the possibilities. Now, if you have a couple of very large pieces of sweater that can easily cover your whole pillow, you can, of course, simply throw the two pieces together, sew up the four sides (leaving a little opening for your pillow to go in), stuff and hand-sew the closure. Because I like to be able to remove my pillow covers -- makes it easier to clean them -- and because my fabric pieces weren't large enough as is, I decided to make a cover that had a contrasting duo-toned front, and a solid-colored back with simple overlapped-fabric opening.
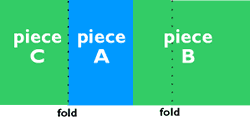
This meant I would use three pieces of fabric that would be joined together, then wrapped around to form the cover:
(Basically, however, you can arrange your sweater sections in whatever manner you like, as long as it'll cover your whole pillow.) 5
I started by laying down the blue piece, taking the largest green piece,
and lining them up along their edges 6 With that done, I placed the joined piece of fabric front-side up on my work surface, then lined up the edge of my pillow at the seam:
I trimmed the fabric as necessary to make sure that the edges were straight, and that the height was about 3/4"-1" greater than the height of the pillow (this allows for 3/8" seams). At this point, I wrapped the extra fabric (piece B) around and up. ---------------------------> lounge . nourish . host . laze . home. |
||||||||||||||||


 3
Square off the
remaining sweater fronts and backs as necessary. Before you start cutting,
drape the sweater remnants over the pillow to determine how to square
the bits -- basically, you
want to make sure that you cut in such a way that the squared-off fabric
that's left will stretch across the width of your pillow, with a little
extra for seams.
3
Square off the
remaining sweater fronts and backs as necessary. Before you start cutting,
drape the sweater remnants over the pillow to determine how to square
the bits -- basically, you
want to make sure that you cut in such a way that the squared-off fabric
that's left will stretch across the width of your pillow, with a little
extra for seams. 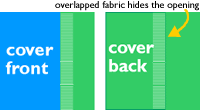
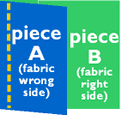 with
the front sides facing each other. I
wanted to use the finished edge of the green sweater as an accent on the
front of the pillow, so I chose this edge for this first seam. I paired
it with an unfinished blue edge. I then sewed the two pieces together,
leaving a 3/8" seam.
with
the front sides facing each other. I
wanted to use the finished edge of the green sweater as an accent on the
front of the pillow, so I chose this edge for this first seam. I paired
it with an unfinished blue edge. I then sewed the two pieces together,
leaving a 3/8" seam.