| .. |
big
decorating
dreams. tiny
little
budget.
don't
be a wallflower! jump
on over to the discussion boards
and get decorating help.
|
|
i got
you covered
!
by
Diana Goodman
|
1 2
3 4
5
continued
from page 4
. |
3
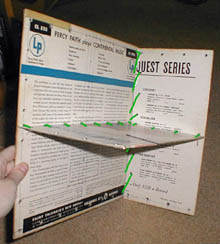
Install the vertical shelf: Line up the vertical shelf's slit with
the horizontal shelf's slit. Push the two together until the
vertical shelf fits against the back of the box.
4
Attach back piece to vertical shelf using the same pattern as
before.
5
Attach the sides -- With about 2 feet of lanyard, lace the long
side to the back, then, with a separate piece of lanyard, attach
the sides to the shelf (using the same pattern as when
you attached the shelves to the back.)
Check out the pictures on the right to see the two ways of
"lacing" pieces together. |

|
TIP #4: There are two benefits to this style of
construction. 1) If you mess up, you can take it apart and re-do it.
2) It doesn't really matter what order you put it together. This way
just requires the least amount of bending, stretching and groping
inside the box for lost thread.
6
Attach top and bottom along the long side, then attach to the vertical
shelf.
7
Lace up the corners.
8
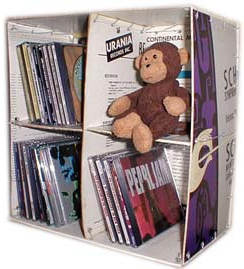
Impress your friends with your stunning creation. Watch them weep with
jealousy.
get the printer-friendly
instructions!
o
Diana Goodman is
a freelancer/editor who believes everything can be recycled into
housewares or designer accessories.
more
lounge articles by Diana Goodman:
high-tech
crafts, low-tech effort
decorating with CDs
| painting
101
--------------------------->
lounge . nourish .
host
. laze . home.
|