| .. |
big
decorating
dreams. tiny
little
budget.
don't
be a wallflower! jump
on over to the discussion boards
and get decorating help.
|
copyright ©1999-2005
DigsMagazine.com.
|
dough
it right
how to make salt dough ornaments
by Yee-Fan Sun |
1
2 3 4
continued from page 2
getting
creative
Once you're ready to start shaping ornaments, you have a couple of
options. The easy, no art skills required method is to roll out the
dough and use cookie cutters to form decorative shapes. For those who
like to get a little more creative, however, there's also the freeform
sculpting option; just treat the dough like clay, and mold the dough
into whatever shape you like.
For both methods, it's best to
pull out only a little dough at a time to work with, keeping the
remaining dough covered. This is especially true if you're getting
elaborately sculpty with your dough and laboring lovingly over each one;
you don't want the dough to dry out before you get a chance to work with
it.
 With
the cookie cutter method, roll out the dough to the desired thickness --
I like ¼" or so, which is just thick enough to make the ornament
nice and sturdy without turning it into a total lead weight. As you're
rolling the dough, periodically lift and rotate the dough to make sure
it's not sticking to the surface. Once it's rolled, use your cookie
cutters to cut out whatever shapes you like. Transfer the cutouts to a
foil-lined baking sheet. Now use a straw, chopstick or whatever other
skinny implement you can find to poke a hole near the top of the
ornament; this is very important, as it gives you a way to hang up the
ornament once it's done. You can bake as is, and either leave plain or
decorate with paint after the ornaments are baked. Alternatively, for a
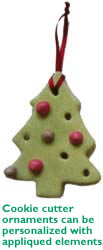
more 3D effect, try decorating the cookie with appliquéd bits of dough.
For my Christmas tree ornament, for example, I rolled tiny little balls
of dough to create ornaments; at each point on the tree where I wanted
to place an ornament, I simply brushed on a little bit of water (this
acts as a sort of glue), then gently pressed the ornament into place. I
also used the straw to produce additional decorative holes in ornaments. With
the cookie cutter method, roll out the dough to the desired thickness --
I like ¼" or so, which is just thick enough to make the ornament
nice and sturdy without turning it into a total lead weight. As you're
rolling the dough, periodically lift and rotate the dough to make sure
it's not sticking to the surface. Once it's rolled, use your cookie
cutters to cut out whatever shapes you like. Transfer the cutouts to a
foil-lined baking sheet. Now use a straw, chopstick or whatever other
skinny implement you can find to poke a hole near the top of the
ornament; this is very important, as it gives you a way to hang up the
ornament once it's done. You can bake as is, and either leave plain or
decorate with paint after the ornaments are baked. Alternatively, for a
more 3D effect, try decorating the cookie with appliquéd bits of dough.
For my Christmas tree ornament, for example, I rolled tiny little balls
of dough to create ornaments; at each point on the tree where I wanted
to place an ornament, I simply brushed on a little bit of water (this
acts as a sort of glue), then gently pressed the ornament into place. I
also used the straw to produce additional decorative holes in ornaments.
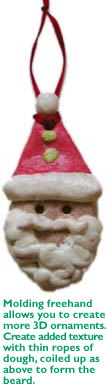 The
sculpting method allows you even more freedom to exercise your
artsy-fartsy instincts. As this method generally involves sticking
together lots of little pieces of dough, it's best to assemble the
ornament directly on the foil-lined baking sheet, to avoid the potential
hassle of having to transfer a complex creation from counter to pan.
It's also good to make sure the bottoms of the ornaments are dusted with
some flour to keep them from sticking; when you press down the main
"body" of each ornament (the base section upon which you'll
build up the ornament), lightly flour the bottom. As with the cookie
cutter ornaments, you can then use a little bit of water to
"glue" on additional bits of dough. And as with the cookie
cutter-style ornaments, don't forget to poke a hanging hole in each
of your masterpieces. The
sculpting method allows you even more freedom to exercise your
artsy-fartsy instincts. As this method generally involves sticking
together lots of little pieces of dough, it's best to assemble the
ornament directly on the foil-lined baking sheet, to avoid the potential
hassle of having to transfer a complex creation from counter to pan.
It's also good to make sure the bottoms of the ornaments are dusted with
some flour to keep them from sticking; when you press down the main
"body" of each ornament (the base section upon which you'll
build up the ornament), lightly flour the bottom. As with the cookie
cutter ornaments, you can then use a little bit of water to
"glue" on additional bits of dough. And as with the cookie
cutter-style ornaments, don't forget to poke a hanging hole in each
of your masterpieces.
don't
stop: there's more this way!
--------------------------->
lounge . nourish .
host
. laze . home.
|