| .. |
need
decorating advice? don't
be a wallflower! jump
on over to the discussion boards.
|
copyright
©1999-2000
DigsMagazine.com.
|
furnishings
first-aid:
How to fix-UP
a $1
Lamp |
1 2 3
4
continued from page 1
|
Below, a step-by-step guide that’ll show you how we turned our
dingy-looking dollar light into a sleek, stylishly retro lamp. With
this lamp, the cosmetic deficiencies – general ugliness of color –
could be easily remedied by changing the cord and painting the spherical
metal shade. Amazingly enough, our one dollar lamp actually worked, but
since the cord looked ancient, I’d have changed it regardless of
whether or not I liked the color.
the toolkit |
screwdriver
spraypaint
extension cord
wire strippers (or at least a Swiss army knife, should you lack the
former, as we did)
tin snips (or scissors that you don’t mind dulling, Swiss Army knife,
razor knife … in other words something sharp that can cut through the
extension cord)
our plan-of-action |
1.
Use a screwdriver to remove the screws that hold the socket in
place within the lampshade.
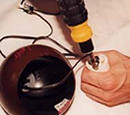 2.
Pull the socket through the
shade; you’ll need easy access to the bottom of the socket, where the
wires of the cord connect to the terminals. Using a screwdriver, loosen
the screws and detach the wires from the socket. If your lamp isn’t
turning on, and the cord isn’t obviously damaged in some way (i.e. it’s
frayed; you have to wiggle it around into just the right position to get
the bulb to stay lit), your socket probably needs to be replaced. Take
the old socket on down to your favorite local hardware store, and look
for a new socket that’s of the same style. If you’ve got a
hardware-store phobia and can’t make any sense of the many lamp parts
you’ll find in the lighting aisle, ask a friendly sales clerk where
you can find a replacement for that socket you’ve got in your hand. 2.
Pull the socket through the
shade; you’ll need easy access to the bottom of the socket, where the
wires of the cord connect to the terminals. Using a screwdriver, loosen
the screws and detach the wires from the socket. If your lamp isn’t
turning on, and the cord isn’t obviously damaged in some way (i.e. it’s
frayed; you have to wiggle it around into just the right position to get
the bulb to stay lit), your socket probably needs to be replaced. Take
the old socket on down to your favorite local hardware store, and look
for a new socket that’s of the same style. If you’ve got a
hardware-store phobia and can’t make any sense of the many lamp parts
you’ll find in the lighting aisle, ask a friendly sales clerk where
you can find a replacement for that socket you’ve got in your hand.
3.
Spraypaint the lampshade. Do this outside, if at all possible, since the
fumes aren’t so
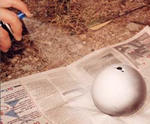 fabulous
for the health, and the paint will dry faster in the sunshine. Spray in
long, thin, even strokes, holding the can at least 6-8 inches away from
the lampshade. Let the first coat dry; apply one or two other coats as
necessary. fabulous
for the health, and the paint will dry faster in the sunshine. Spray in
long, thin, even strokes, holding the can at least 6-8 inches away from
the lampshade. Let the first coat dry; apply one or two other coats as
necessary.
more
this way
--------------------------->
lounge . nourish .
host
. laze . home.
|