digsandthat.com

DigsMagazine.com
transform your space into
your personal haven
.
.
.

what's for dinner?

take the poll


a home + living guide for the post-college, pre-parenthood, quasi-adult generation

10.21.2002

home
editor's note 
_____________

DEPARTMENTS
 
o lounge 
o nourish 
 
o host
o
laze
_____________

o BOARDS
o SHOP new!
o send an ECARD
_____________

about
contact
submit your ideas
support digs
search
links  

..
big decorating dreams. tiny little budget. don't be a wallflower! jump on over to the discussion boards and get decorating help.
 
..
other recent LOUNGE articles:
o Essentially Essential
o
Cleaning Essentials
o
Make a Pillow Sham
o
Bathe in Beauty
o
Decorating Scents
o
Plumb Trouble
o
Home Alone
o
Office Space: Color Shemes
o Open House: Sydney Sanctuary
o Burn Baby Burn
o
Green Scene: Indoor Herb Gardening
o
Album-cover CD Box
o
A Room of My Own
o
Fight the Chaos
o
Gallery-style Picture Hanging Tracks

copyright ©1999-2002
DigsMagazine.com.

please  do touch how to make a 
texture art wall
by Yee-Fan Sun
|  1 2 3 4
continued from page 2

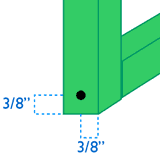
1 Measure out 12" long sections of the 1"x1"s and mark with a pencil. Using a wood saw or table saw, cut the wood. Sand the ends smooth.
2 Glue together each frame as pictured below:

Let the glue dry and set.

3 Using a drill bit that's just a bit smaller than the diameter of your screw (the idea is that you want it to be the screw diameter minus the threads, to give the screw just enough wood to grab onto), drill holes at each corner, as pictured, 3/8" in from the edges.

4 Insert screws at each drilled hole. Voila – you have a frame!

5 Measure out a 12.5" square piece of the wood and mark with a pencil. Using a utility knife and straight-edge, score the lines several times to get a good groove to act as a guide. Once you’ve scored the wood sufficiently, you can apply a bit more pressure to cut through – it’s best to be patient and do several careful, shallower cuts than to try and force your way through on one-go. Once you’ve cut out your square, lightly sand the splintery edges. Staple the board to the back of the frame.

get crafty
Now comes the fun part – filling those frames you just assembled. Think about what sorts of textures you find interesting – soft textures, rough textures, smooshy textures, elastic textures, slick textures, bristly textures, silky textures, nubbly textures, spongy textures … you get the idea right? Anything goes. There’s a wide, wide world full on interesting things to touch – the idea with this project is to find a few of your favorites to display on your wall.

that's right: still more this way!

---------------------------> lounge . nourish . host . laze . home.