 |
|
|
|
 |
|
. |
|
||||||||||||||
copyright ©1999-2002 |
4
Time now to work on the frames. On the back of each frame, find the
middle
5 Before mounting the spine to the wall, make sure the frames fit properly – it’ll be a lot easier to fix mistakes now than after you’ve already screwed the spine into place. Pop on the frames and make sure they look right – frames can be wiggled a little too straighten them out and line them up. If everything looks good, remove the frames.
Because the thickness of the spine is a bit deeper than the length of the screws, you’ll need to countersink the screws. To do so, use a drill bit that’s just a bit larger than the size of the screwhead, and drill about ¼" into the wood at each hole on the spine, being careful not to drill all the way through. Once that’s done, put the spine back up against the wall and line up the holes with the anchors. Attach the screws, pop on the frames, and enjoy your brand new wall art. get printer-friendly directions o check out these related articles: post-posters | hang-up help | picture hanging tracks ---------------------------> lounge . nourish . host . laze . home. |
||||||||||||||||


 points
along the top and the bottom edges, and mark with a dotted line. Make
dots in the following places on the back of each frame:
points
along the top and the bottom edges, and mark with a dotted line. Make
dots in the following places on the back of each frame: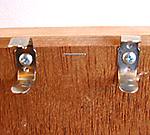 Drill
a guide hole at each dot using a drill bit just a bit narrower than the
diameter of your screw. Don’t drill too deeply – the hole should be
a little shallower than the length of the screw. Once you’ve made the
guide holes, line up the clasp pieces of the rolling catches over the
holes, and screw into place.
Drill
a guide hole at each dot using a drill bit just a bit narrower than the
diameter of your screw. Don’t drill too deeply – the hole should be
a little shallower than the length of the screw. Once you’ve made the
guide holes, line up the clasp pieces of the rolling catches over the
holes, and screw into place.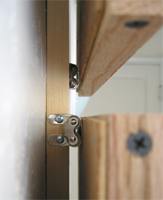 6
Hold the spine up to the wall and determine where you want to place it.
Using a drill bit just a bit larger than your drywall screws, pre-drill
three holes through the spine and into the wall: one near the top, one
near the bottom, and one in the middle. Set the spine aside. Screw in
the anchors into each hole in the wall.
6
Hold the spine up to the wall and determine where you want to place it.
Using a drill bit just a bit larger than your drywall screws, pre-drill
three holes through the spine and into the wall: one near the top, one
near the bottom, and one in the middle. Set the spine aside. Screw in
the anchors into each hole in the wall.